Mastering the Automotive Digital Realm: From Photorealistic Renders to Custom 3D Printed Car Parts
Mastering the Automotive Digital Realm: From Photorealistic Renders to Custom 3D Printed Car Parts
The automotive industry has always been at the forefront of innovation, and the digital realm is no exception. Today, 3D car models are far more than just visual representations; they are powerful, versatile assets that drive everything from cutting-edge product design and immersive marketing campaigns to high-performance game development and the tangible creation of custom 3D printed car parts. Whether you’re an automotive designer visualizing the next generation of vehicles, a game developer crafting exhilarating virtual races, an architect integrating vehicles into a scene, or an enthusiast creating a bespoke component for your dream car, understanding the intricate workflows of 3D automotive design is paramount.
This comprehensive guide delves deep into the technical nuances of creating, optimizing, and deploying 3D car models across diverse applications. We’ll explore the foundational principles of clean topology and efficient UV mapping, demystify the art of PBR material creation for breathtaking realism, and walk through advanced rendering techniques. Beyond visual fidelity, we’ll tackle the critical aspects of game engine optimization for seamless interactive experiences, the specific demands of AR/VR, and perhaps most excitingly, the practical steps involved in preparing your digital creations for 3D printing real-world custom parts. Get ready to elevate your automotive 3D projects and unlock their full potential.
The Foundation: Flawless 3D Automotive Topology and Mesh Integrity
At the heart of every high-quality 3D car model lies impeccable topology – the structural arrangement of polygons that defines the mesh. For automotive designs, where smooth, reflective surfaces and intricate panel gaps are critical, clean topology is not just a best practice; it’s a necessity. Poor topology can lead to artifacts, pinching, and undesirable shading, especially when models are subjected to subdivision surfaces or deformation. A well-constructed mesh ensures that your model looks pristine from every angle, behaves predictably under various modifiers, and is easily editable for future iterations or custom adjustments. This meticulous approach is foundational, impacting everything from the realism of your renders to the printability of your designs.
Understanding Edge Flow and Polygon Distribution
The way polygons (typically quads) and their edges flow across the surface of an automotive model directly dictates how light interacts with it and how subdivision surfaces will smooth it. Optimal edge flow follows the contours and creases of the vehicle, defining areas like fender flares, door lines, and body curves with precision. While quads (four-sided polygons) are the gold standard for organic and hard-surface modeling, especially when using subdivision modifiers, triangles can be acceptable in flat, non-deforming areas or for game-ready low-poly models where poly count is a premium. Ngons (polygons with more than four sides) should generally be avoided, as they can cause unpredictable shading and issues during subdivision. Poles (vertices where more than five edges meet) should be strategically placed in flatter, less visible areas to minimize their impact on surface smoothness. For a hero-asset car model intended for high-end rendering, polygon counts typically range from 150,000 to 300,000 polygons, carefully distributed to maintain detail where needed without excessive density in flat areas. Game-ready LODs (Levels of Detail) would drastically reduce this, potentially down to 20,000-50,000 polygons for a primary in-game view, or even fewer for distant LODs.
Optimizing for Subdivision Surfaces and Hard Surface Modeling
Subdivision surfaces (like OpenSubdiv in 3ds Max, Blender’s Subdivision Surface modifier, or Maya’s Smooth Mesh) are indispensable for achieving the smooth, flowing lines characteristic of car bodies from relatively low-poly base meshes. To control the sharpness of edges and maintain geometric integrity, supporting edge loops are crucial. These are extra edge loops placed close to a sharp edge, which “tighten” the edge when subdivision is applied. For instance, around a headlight cutout or along a panel gap, two or three closely spaced edge loops will create a crisp, defined seam. Beveling edges, even those that appear sharp to the naked eye, is also a critical technique. A slight bevel, often just a few segments wide, catches and reflects light, adding immense realism and preventing objects from looking artificially sharp. While Boolean operations can be a quick way to create complex cutouts, they often result in messy, non-quad topology. For production-ready models, it’s best to use Booleans as a starting point, then meticulously clean up the resulting mesh by hand, converting ngons to quads and ensuring proper edge flow around the new geometry. This rigorous attention to detail ensures your 3D car models are robust, visually appealing, and ready for any application, including the demanding requirements of 3D printing, which often necessitates watertight, manifold meshes.
Bringing Surfaces to Life: UV Mapping and PBR Materials
Once your 3D car model’s geometry is perfected, the next crucial step is to define its appearance through textures and materials. This involves two core processes: UV mapping, which lays out the 3D surface onto a 2D plane for texturing, and creating Physically Based Rendering (PBR) materials, which simulate how light interacts with surfaces in a physically accurate way. The combination of expert UV unwrapping and sophisticated PBR shader networks is what transforms a grey mesh into a photorealistic automotive masterpiece, ready for high-fidelity renders, interactive experiences, or even informing the finish of a custom 3D printed part.
Strategic UV Unwrapping for Automotive Assets
UV mapping is the process of flattening the 3D surface of your model into 2D UV coordinates, which tells your rendering software how to apply 2D textures to the 3D mesh. For complex automotive surfaces, strategic UV unwrapping is key to avoiding stretching, distortion, and noticeable seams. The goal is to minimize visible seams by placing them in less conspicuous areas (e.g., along panel lines, under trim pieces, or hidden edges). Texel density – the number of texture pixels per unit of surface area – should be consistent across the model, ensuring that details appear uniform and proportional. Tools like 3ds Max’s UVW Unwrap modifier, Blender’s UV Editor, or Maya’s UV Toolkit offer powerful features for precise control, including unwrapping methods like Pelt mapping or Planar mapping, and packing algorithms to efficiently utilize UV space. For a car, you might dedicate separate UV islands for large body panels, intricate engine parts, tire treads, interior components, and small details like badges or emblems. Overlapping UVs can be used for mirrored parts (like left and right doors) or for small, non-unique elements, but generally, unique UVs are preferred for hero assets to allow for specific weathering or decals.
Crafting Realistic PBR Shaders for Cars
Physically Based Rendering (PBR) has revolutionized material creation by accurately simulating real-world light interactions, leading to incredibly convincing results. PBR materials rely on a set of texture maps that define various surface properties:
- Albedo/Base Color: The inherent color of the surface, stripped of lighting information.
- Metallic: Defines whether a surface is a metal (value near 1) or a dielectric/non-metal (value near 0).
- Roughness: Determines how rough or smooth a surface is, impacting the sharpness of reflections. (A glossy car paint would have very low roughness, while matte plastic would have high roughness).
- Normal Map: Adds high-frequency surface detail (like subtle imperfections or panel lines) without increasing polygon count.
- Ambient Occlusion (AO): Simulates soft shadows where surfaces are close together, enhancing perceived depth.
- Opacity Map: For transparent or cutout elements like glass or mesh grilles.
Creating realistic car paint is a common challenge. It often involves a layered shader approach, simulating a base coat, metallic flakes (via a noise texture or procedural shader), and a clear coat layer with specific reflection and refraction properties. Chrome and other metals use high metallic values and varying roughness. Glass materials require accurate transmission, refraction, and subtle reflections. These properties are typically defined within node-based shader networks in renderers like Arnold, Cycles, Corona, or V-Ray. Professional-grade 3D car models, such as those found on 88cars3d.com, typically come with expertly crafted PBR materials, ready to be dropped into your scene and tweaked to perfection.
Capturing the Vision: Advanced Rendering Workflows
With a meticulously modeled and textured 3D car, the next step is to transform it into a stunning image or animation through advanced rendering. This phase is where artistic vision truly comes to life, leveraging sophisticated lighting, camera techniques, and post-processing to evoke emotion and communicate design intent. Whether you’re aiming for photorealistic studio shots or dynamic action sequences, a deep understanding of rendering workflows is essential to achieve professional-grade results that stand out in a competitive visual landscape.
Lighting Setups for Automotive Visualization
Effective lighting is the single most critical factor in achieving photorealistic automotive renders. It defines the mood, emphasizes form, and highlights the intricate details of your 3D car model.
- HDRI (High Dynamic Range Image) Lighting: HDRIs are spherical panoramic images that capture real-world lighting and environment data. They are invaluable for realistic automotive renders, providing accurate illumination, reflections, and ambient color. Using a high-quality HDRI of an outdoor environment (e.g., a sunny highway, an overcast forest, or a city street) or an indoor studio setup can instantly ground your car in a believable scene.
- Studio Lighting Setups: For controlled, dramatic shots, a virtual studio setup is often preferred. This typically involves using large virtual softboxes, strip lights, and reflectors to sculpt the car’s surfaces. Key lights illuminate the main subject, fill lights soften shadows, and rim lights (or kickers) separate the car from the background, emphasizing its silhouette. Careful placement of these lights allows you to control reflections on the car’s body, highlighting its curves and panel lines.
- Physical Camera Settings: Emulating real-world photography principles with physical camera settings is crucial. Parameters like F-stop (controlling depth of field and exposure), shutter speed (affecting motion blur), and ISO (controlling sensitivity/noise) should be adjusted just as they would on a DSLR. A shallow depth of field, for instance, can artfully blur the background, drawing focus to the car.
Renderers such as Corona Renderer, V-Ray (often used with 3ds Max), Cycles (Blender), and Arnold (Maya) provide the tools and flexibility to create these complex lighting scenarios, with features like adaptive sampling, light portals, and unbiased rendering engines ensuring high-quality output.
Optimizing Render Settings and Post-Processing
Achieving a high-quality render involves more than just lighting; it requires careful optimization of render settings and a robust post-processing workflow.
- Render Engine Settings: Each renderer has specific settings that influence render time and quality. Understanding concepts like sampling rates (e.g., ray samples, light samples), global illumination settings (e.g., brute force, irradiance map), and ray depth limits (for reflections and refractions) is vital. Denoisers, integrated into modern renderers like OptiX (NVIDIA) or OpenImageDenoise (Intel), can significantly reduce render times by cleaning up noisy images with minimal quality loss.
- Render Passes/Elements: To gain maximum control over your final image, render out multiple passes or elements. These typically include:
- Beauty Pass: The final rendered image.
- Reflection Pass: Just the reflections on your materials.
- Refraction Pass: For transparent objects like glass.
- Ambient Occlusion Pass: For enhancing soft shadows and contact areas.
- Z-Depth Pass: Provides depth information for creating post-process depth of field.
- Material ID / Object ID Pass: Masks for easy selection of specific parts in compositing.
These passes are then layered and adjusted in a compositing software like Adobe Photoshop, Affinity Photo, or Blackmagic Fusion/Nuke.
- Post-Processing and Compositing: This is where the image truly comes alive. Key adjustments include color correction (white balance, hue, saturation), curves and levels for contrast and brightness, sharpening, and adding atmospheric effects. Lens effects like chromatic aberration, subtle bloom for bright areas, and lens flare can lend a cinematic quality. Vignetting can draw attention to the center, while grain or noise can help integrate CG elements with photographic backgrounds. By leveraging high-quality 3D car models from marketplaces like 88cars3d.com, artists can focus more on the creative aspects of lighting, rendering, and post-processing, significantly streamlining their workflow and achieving stunning visual results faster.
Real-Time Performance: Game Engine and AR/VR Optimization
While photorealistic renders captivate in static images, the demands of real-time applications like video games and augmented/virtual reality are fundamentally different. Here, the primary goal shifts from ultimate fidelity to maintaining consistently high frame rates while still delivering an immersive and visually appealing experience. Optimizing your 3D car models for game engines and AR/VR platforms requires a specialized workflow that balances visual quality with performance efficiency, ensuring smooth interaction and compelling immersion.
LODs, Draw Calls, and Texture Atlasing for Games
When preparing 3D car models for game engines like Unity or Unreal Engine, several core optimization strategies come into play:
- Levels of Detail (LODs): This is paramount for managing polygon count. A sophisticated 3D car model might have multiple LODs, each with a progressively lower polygon count. LOD0 (the highest detail) is used when the car is close to the camera, while LOD1, LOD2, and LOD3 are swapped in as the car moves further away. Creating LODs can be automated with tools within game engines or DCC software, but manual creation often yields better, more controlled results, focusing polygon reduction on less visible areas while preserving critical silhouettes. For instance, a hero car might have LOD0 at 80,000 tris, LOD1 at 40,000, LOD2 at 15,000, and LOD3 at 5,000.
- Reducing Draw Calls: Every time the game engine has to switch materials or draw a separate mesh, it incurs a “draw call,” which consumes CPU resources. Minimizing draw calls is crucial for performance. This involves merging meshes (e.g., combining all the small interior components into a single mesh) and combining materials (e.g., using a single texture atlas for all interior elements instead of separate textures for each knob or button).
- Texture Atlasing: A texture atlas combines multiple smaller textures into one larger texture sheet. This allows a single material to reference many parts of a model, significantly reducing the number of material swaps and, consequently, draw calls. For example, all the decals, badges, and small details on a car could be placed on one atlas, with corresponding UVs pointing to the correct areas. This is often accompanied by baking ambient occlusion and normal maps from high-poly models onto the lower-poly game meshes to retain surface detail without additional geometry.
Specific Considerations for AR/VR Experiences
Augmented Reality (AR) and Virtual Reality (VR) impose even stricter performance requirements than traditional games, primarily due to the need for very high, stable frame rates (typically 90 frames per second or higher for VR to prevent motion sickness).
- Aggressive Poly Count Reduction: AR/VR models must be extremely lean. A car model that’s acceptable for a PC game might still be too heavy for a mobile AR experience. Focus on reducing vertices wherever possible without compromising the essential silhouette. For mobile AR, target poly counts might be as low as 20,000-50,000 triangles for an entire vehicle, including wheels and basic interior.
- Mobile Optimization: Many AR applications run on smartphones, necessitating further optimization. Baked lighting (pre-calculated light information stored in textures) is preferred over real-time dynamic lighting, as it’s far less computationally expensive. Texture resolutions should also be carefully managed, often sticking to 512×512 or 1024×1024 pixels for smaller elements, and 2048×2048 for larger surfaces like body panels.
- Lightweight File Formats: For web-based AR/VR, formats like GLB (the binary version of glTF) are ideal. GLB files are highly optimized for web delivery, containing geometry, materials, and animations in a single, compact file. For Apple’s AR Quick Look, the USDZ format is the standard, combining the power of Universal Scene Description (USD) with the portability of glTF. These formats are designed to be loaded and rendered quickly on mobile devices. Imagine previewing a 3D car model in true scale on your driveway through your smartphone – this seamless experience is powered by carefully optimized assets and efficient file formats.
From Screen to Reality: 3D Printing Custom Car Parts and Models
The ability to translate digital designs into physical objects is one of the most exciting applications of 3D modeling. For automotive enthusiasts, designers, and engineers, 3D printing offers an unprecedented opportunity to create custom car parts, scale models, prototypes, and bespoke accessories. However, bridging the gap from a virtual 3D car model to a tangible, successful 3D print requires specific considerations and preparation techniques that go beyond what’s needed for rendering or game development.
Preparing Automotive Models for 3D Printing
A render-ready 3D car model, even one with impeccable topology, isn’t automatically ready for 3D printing. The physical nature of printing introduces a new set of requirements:
- Watertight Meshes: This is the most crucial requirement. A 3D model for printing must be “watertight” or “manifold,” meaning it has no holes, gaps, disconnected edges, or inverted normals that would confuse the slicer software. Imagine filling the model with water – it shouldn’t leak. Common issues include missing faces, internal geometry that isn’t connected to the exterior, and self-intersecting polygons.
- Mesh Repair Tools: Software like Autodesk Meshmixer, Netfabb, or the 3D Print Toolbox add-on in Blender are invaluable for identifying and repairing these issues. They can automatically detect holes, fix flipped normals, and make the mesh manifold. However, automated repairs sometimes alter the geometry in undesirable ways, so manual cleanup and inspection remain vital, especially for precision parts.
- Wall Thickness: Unlike digital models, physical prints require a minimum wall thickness to be structurally sound and printable. This minimum varies significantly depending on the printing technology and material (e.g., 1mm for most FDM plastics, 0.5mm for some resins). Thin, unsupported elements will simply break or not form correctly. You might need to add thickness to design elements that are too thin in your original render model.
- Scaling and Unit Consistency: Ensure your model is scaled correctly in your 3D software before exporting. If you design a part to be 10cm long, it must be exported with the correct units so the slicer software interprets it accurately.
- Removing Internal Geometry: For hollow parts, ensure any unnecessary internal geometry (e.g., the backside of a dashboard that won’t be visible) is removed to save material and print time.
Material Selection and Printing Technologies
The choice of 3D printing technology and material significantly impacts the quality, strength, and application of your custom car parts or models:
- FDM (Fused Deposition Modeling): This is the most common and affordable method, extruding molten plastic layer by layer. Materials like PLA, ABS, and PETG are popular. FDM is excellent for functional prototypes, jigs, fixtures, and moderately detailed custom parts (e.g., custom interior trim, replacement clips, non-critical engine covers). It offers good strength but visible layer lines.
- SLA (Stereolithography) / DLP (Digital Light Processing): These resin-based technologies cure liquid resin with a laser or projector, producing highly detailed, smooth surfaces. Ideal for high-fidelity scale models, intricate decorative pieces, and complex functional prototypes where surface finish is critical. Resins vary in strength and flexibility.
- SLS (Selective Laser Sintering): Uses a laser to fuse powdered nylon or other materials. SLS parts are strong, flexible, and have a slightly rough, uniform finish. They are excellent for durable functional prototypes and end-use custom components, as they don’t require support structures, allowing for very complex, interlocking geometries (e.g., custom intake manifolds, bespoke brackets).
- Metal 3D Printing (DMLS/SLM): Directly prints metal powders, creating incredibly strong, heat-resistant, and complex metal parts. While expensive, it’s used for critical functional components in motorsports or aerospace where traditional manufacturing is impossible (e.g., lightweight exhaust manifolds, specialized brackets).
Post-processing steps like sanding, priming, painting, and applying clear coats can dramatically enhance the appearance and durability of 3D printed car parts, bringing them closer to OEM quality. Leveraging high-quality 3D car models from resources like 88cars3d.com provides an ideal starting point for these ambitious 3D printing projects, ensuring accurate proportions and intricate details.
Managing Your Assets: File Formats and Cross-Platform Compatibility
In the complex landscape of 3D production, your ability to seamlessly move assets between different software applications, renderers, game engines, and even 3D printers is paramount. This cross-platform compatibility hinges on a thorough understanding of various 3D file formats, each with its strengths, limitations, and specific use cases. Choosing the right format and ensuring data integrity during conversion is a critical skill for any professional working with 3D car models.
The Ecosystem of 3D File Formats
The world of 3D file formats is diverse, catering to different stages of the production pipeline:
- FBX (Filmbox): Developed by Autodesk, FBX is arguably the most widely used interchange format in the entertainment industry. It supports not only mesh data but also animations, cameras, lights, and PBR materials. This makes it an excellent choice for transferring complex 3D car models between DCC (Digital Content Creation) software like 3ds Max, Maya, and Blender, and then into game engines like Unity or Unreal Engine.
- OBJ (Wavefront Object): A universal and venerable format, OBJ is excellent for transferring mesh geometry and UV coordinates. It’s highly compatible across almost all 3D software. However, it does not support animation, advanced material definitions (beyond basic color/texture references), or complex scene data, making it less suitable for entire scenes but perfect for clean mesh exports.
- GLB/glTF (GL Transmission Format): An open standard developed by the Khronos Group, glTF is quickly becoming the “JPEG of 3D.” Optimized for web and real-time applications, it efficiently stores PBR materials, animations, and hierarchical scene data in a compact, web-friendly package. GLB is the binary version, embedding all assets (textures, geometry) into a single file, ideal for quick loading in browsers and AR/VR experiences.
- USDZ (Universal Scene Description Zip): Apple’s proprietary format for AR, USDZ builds upon Pixar’s USD framework and typically packages glTF/GLB data. It’s specifically designed for viewing high-quality 3D content in AR Quick Look on Apple devices, combining robust scene description with compact AR delivery.
- STEP / IGES: These are CAD (Computer-Aided Design) formats, primarily used in engineering and manufacturing. They store precise mathematical representations of surfaces (NURBS) rather than polygon meshes. While essential for industrial design and production, they often need to be converted to polygon meshes for rendering or game development, which can be a complex process.
- STL (Stereolithography): The industry standard for 3D printing. STL files describe only the surface geometry of a 3D object using a tessellated mesh of triangles, without color, texture, or material information. It’s a fundamental format for sending models to slicing software.
Workflow for Conversion and Data Integrity
Moving a 3D car model through different pipelines often involves exporting from one format and importing into another. This process requires attention to detail to maintain data integrity:
- Scale and Axis Orientation: Different software packages can use different unit systems (e.g., centimeters, meters) and axis orientations (e.g., Z-up, Y-up). Always verify and adjust scale and rotation upon import/export to prevent your model from appearing tiny, gigantic, or rotated incorrectly.
- Material Conversion Issues: PBR materials, especially complex shader networks, rarely translate perfectly between renderers (e.g., Corona materials won’t directly import into Arnold). FBX can carry basic material assignments and texture paths, but you’ll often need to rebuild or reconnect PBR texture maps manually in the target application. This is where standardized PBR workflows (like Metallic-Roughness) help bridge the gap.
- Using Bridge Tools and Exporters: Most DCC software (3ds Max, Blender, Maya) have robust built-in import/export functionalities. Many also offer specialized “bridge” tools or plugins for direct integration with game engines like Unity or Unreal, which can simplify the transfer process and preserve more data.
- Preserving UVs and Normals: Always ensure that your UV maps and surface normals are correctly exported and imported. Incorrect normals can lead to black faces or inverted shading, while corrupted UVs mean your textures won’t appear correctly.
The value of clean, well-organized assets cannot be overstated. When sourcing 3D models, such as high-quality automotive designs from 88cars3d.com, you benefit from models often prepared with clean topology, proper UVs, and multiple file format options, significantly streamlining your workflow and ensuring smooth cross-platform compatibility.
Conclusion
The journey through the automotive digital realm is expansive, offering incredible opportunities for creativity and innovation. We’ve explored the critical foundations of impeccable 3D car model topology, emphasizing how clean geometry is the bedrock for all subsequent stages, from stunning visualizations to robust 3D prints. We delved into the artistry of UV mapping and PBR material creation, unveiling how physically accurate shaders bring surfaces to life with breathtaking realism. Our exploration continued into advanced rendering workflows, mastering lighting and post-processing to craft photorealistic images, and then shifted gears to the demanding yet rewarding world of game engine and AR/VR optimization, where performance meets immersion. Finally, we bridged the digital and physical, examining the intricate process of preparing 3D models for 3D printing, enabling the creation of bespoke custom car parts and meticulously detailed scale models.
Each of these disciplines—modeling, texturing, rendering, optimizing, and printing—represents a specialized skill set, yet they are all interconnected, relying on the quality and integrity of the initial 3D asset. A solid understanding of these technical workflows not only elevates your projects but also empowers you to tackle diverse challenges across industries. We encourage you to apply these insights to your own creative endeavors, push the boundaries of what’s possible, and continue to explore the vast potential of 3D automotive design. When you’re ready to start your next project with exceptional assets, remember that platforms like 88cars3d.com offer a curated selection of professional-grade 3D car models, meticulously crafted and ready to be the cornerstone of your next masterpiece, whether it’s a render, a game, an AR experience, or a custom 3D printed component. The digital garage awaits your next creation.
Featured 3D Car Models
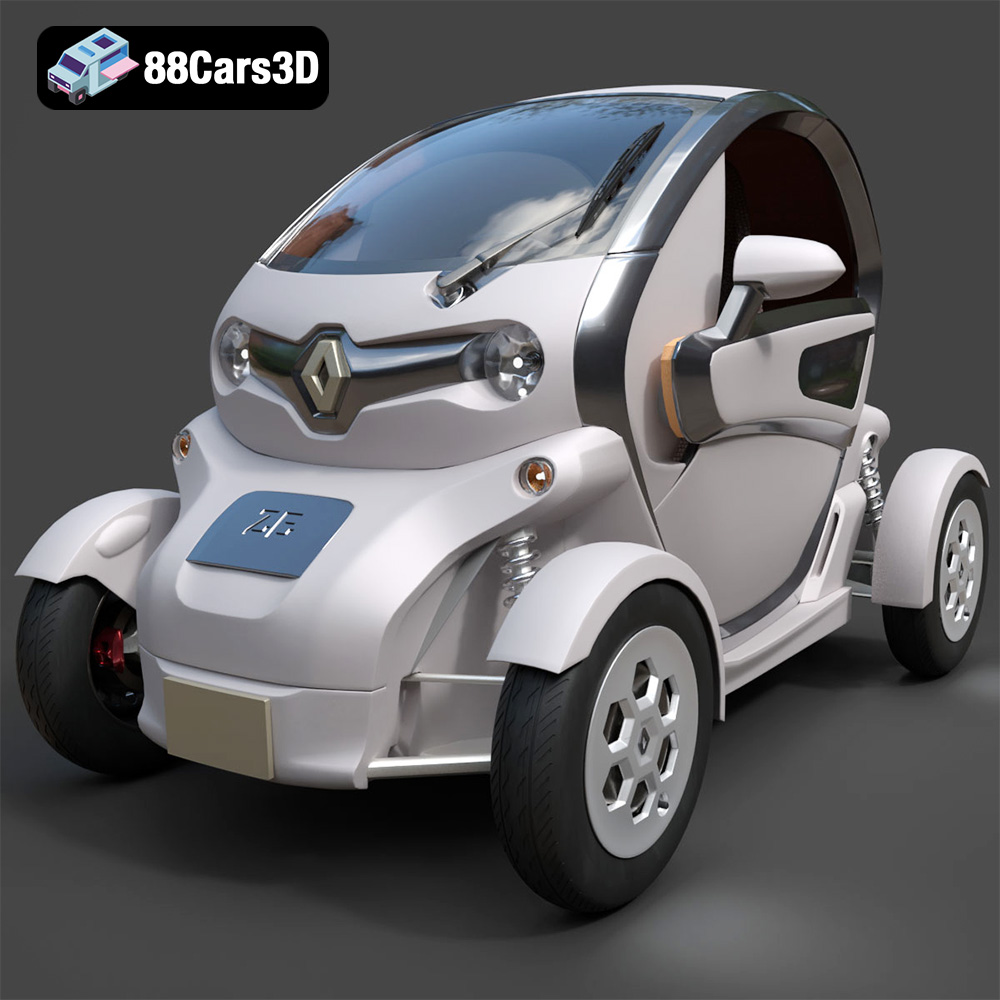
Renault Twizy ZE 3D Model
Texture: Yes
Material: Yes
Download the Renault Twizy ZE 3D Model featuring clean geometry, realistic detailing, and a fully modeled interior. Includes .blend, .fbx, .obj, .glb, .stl, .ply, .unreal, and .max formats for rendering, simulation, and game development.
Price: $4.99
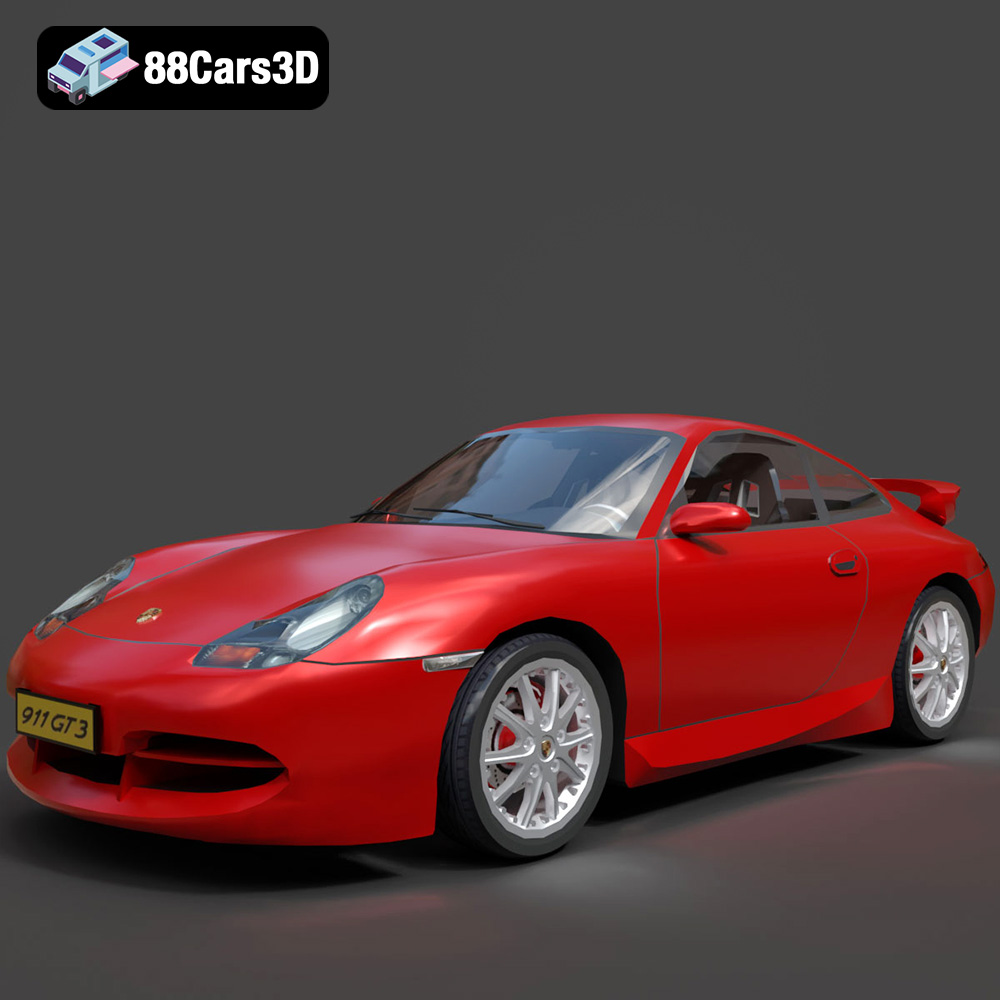
Porsche 911 GT3 3D Model
Texture: Yes
Material: Yes
Download the Porsche 911 GT3 3D Model featuring clean geometry, realistic detailing, and a fully modeled interior. Includes .blend, .fbx, .obj, .glb, .stl, .ply, .unreal, and .max formats for rendering, simulation, and game development.
Price: $4.99
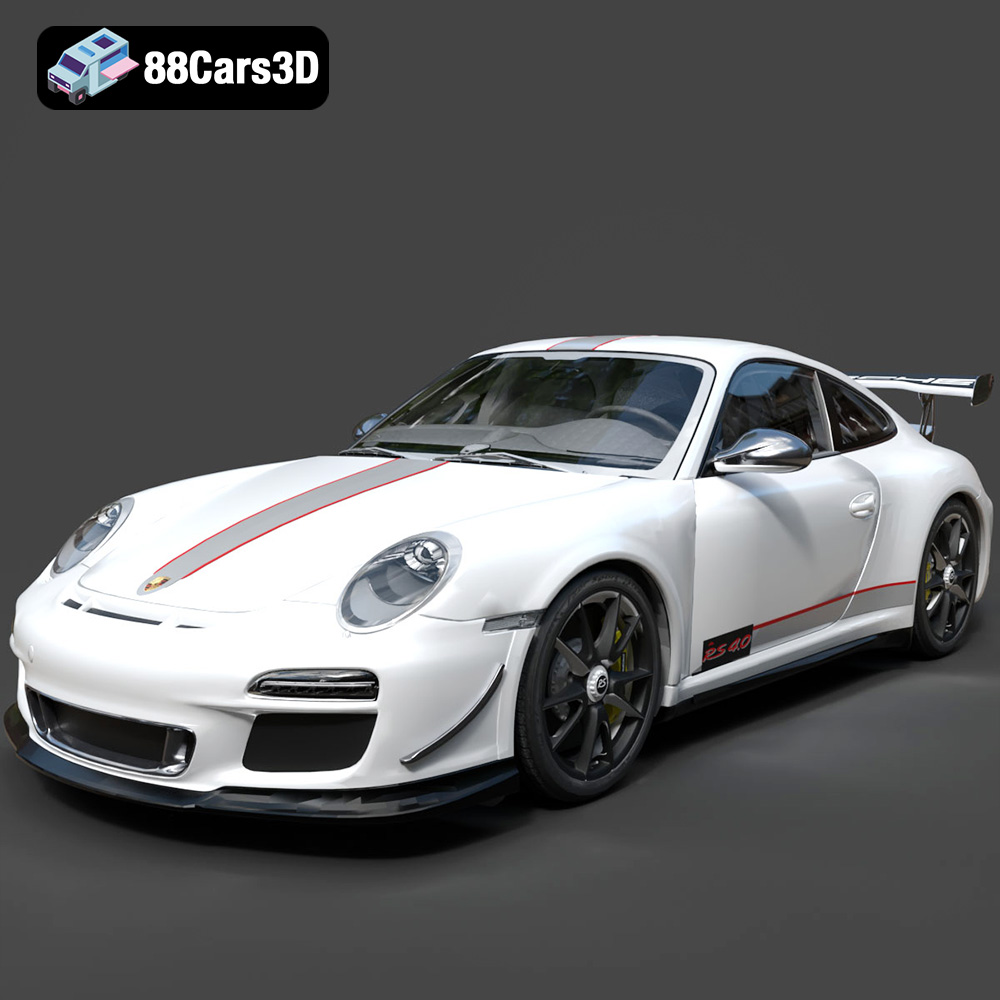
Porsche 911 997 GT3 RS 4.0 2011 3D Model
Texture: Yes
Material: Yes
Download the Porsche 911 997 GT3 RS 4.0 2011 3D Model featuring clean geometry, realistic detailing, and a fully modeled interior. Includes .blend, .fbx, .obj, .glb, .stl, .ply, .unreal, and .max formats for rendering, simulation, and game development.
Price: $4.99
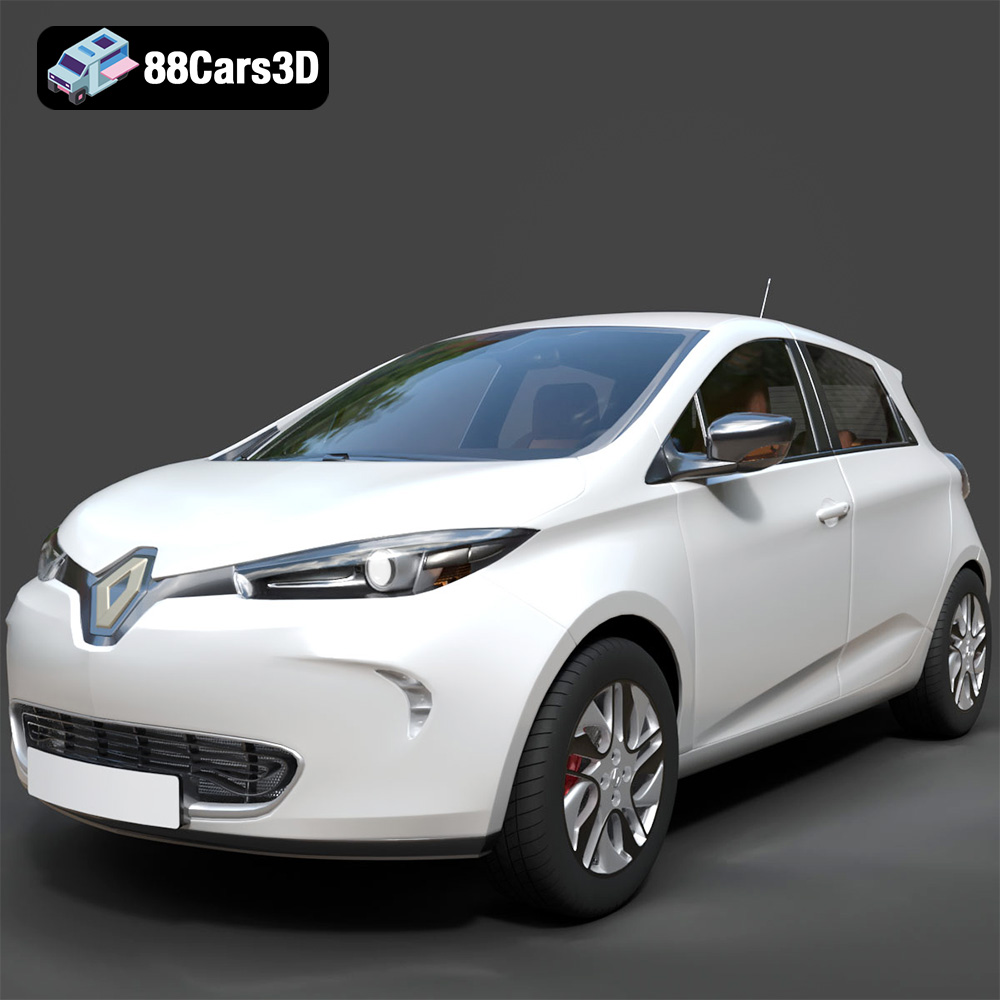
Renault Zoe 3D Model
Texture: Yes
Material: Yes
Download the Renault Zoe 3D Model featuring clean geometry, realistic detailing, and a fully modeled interior. Includes .blend, .fbx, .obj, .glb, .stl, .ply, .unreal, and .max formats for rendering, simulation, and game development.
Price: $4.99
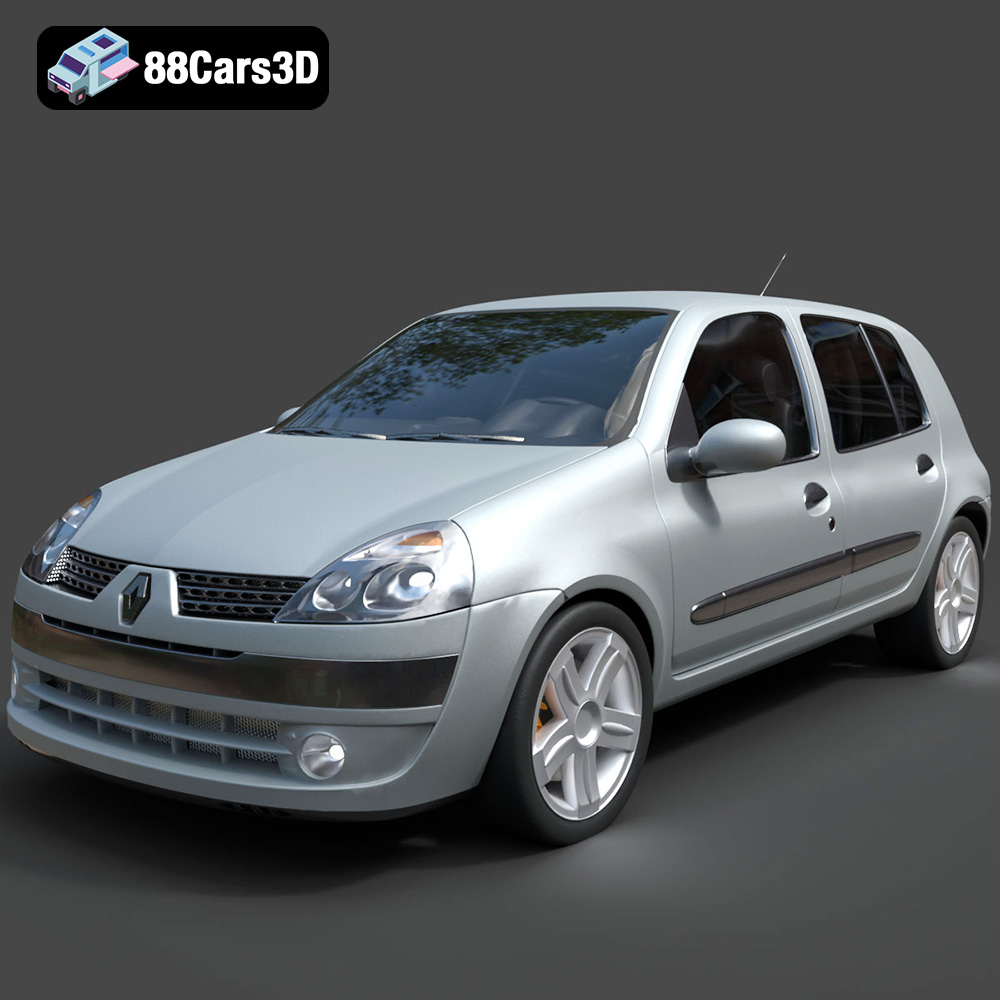
Renault Clio 2025 3D Model
Texture: Yes
Material: Yes
Download the Renault Clio 2025 3D Model featuring clean geometry, realistic detailing, and a fully modeled interior. Includes .blend, .fbx, .obj, .glb, .stl, .ply, .unreal, and .max formats for rendering, simulation, and game development.
Price: $4.99
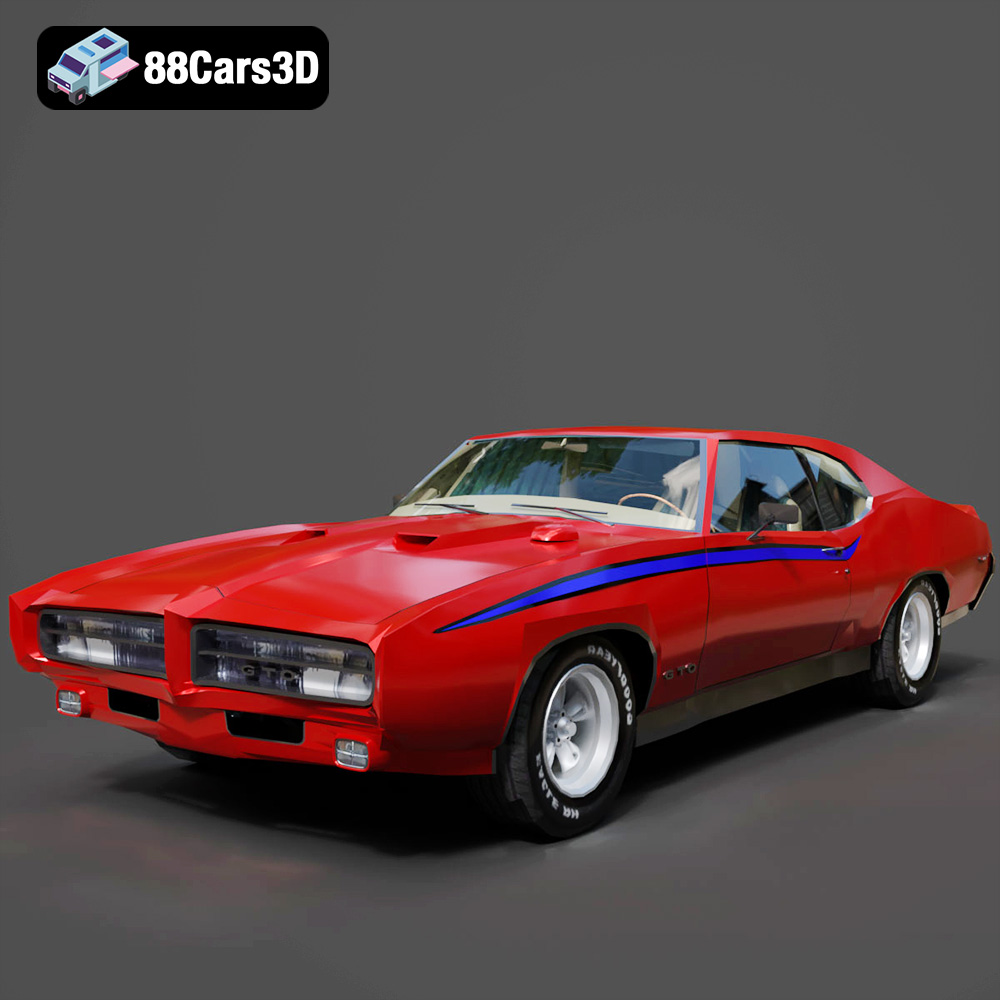
Pontiac GTO The Judge 1969 3D Model
Texture: Yes
Material: Yes
Download the Pontiac GTO The Judge 1969 3D Model featuring clean geometry, realistic detailing, and a fully modeled interior. Includes .blend, .fbx, .obj, .glb, .stl, .ply, .unreal, and .max formats for rendering, simulation, and game development.
Price: $4.99

Pontiac GTO 2000 3D Model
Texture: Yes
Material: Yes
Download the Pontiac GTO 2000 3D Model featuring clean geometry, realistic detailing, and a fully modeled interior. Includes .blend, .fbx, .obj, .glb, .stl, .ply, .unreal, and .max formats for rendering, simulation, and game development.
Price: $4.99
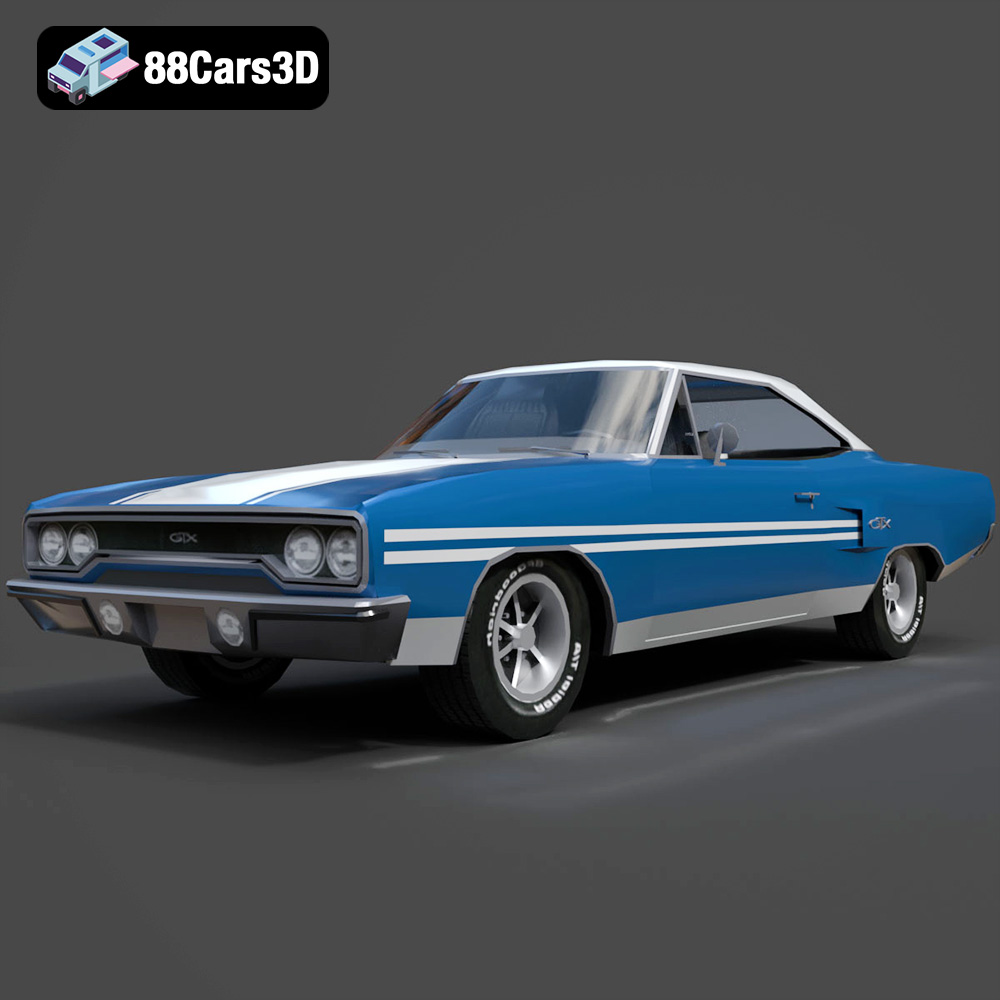
Plymouth GTX 1970 3D Model
Texture: Yes
Material: Yes
Download the Plymouth GTX 1970 3D Model featuring clean geometry, realistic detailing, and a fully modeled interior. Includes .blend, .fbx, .obj, .glb, .stl, .ply, .unreal, and .max formats for rendering, simulation, and game development.
Price: $10
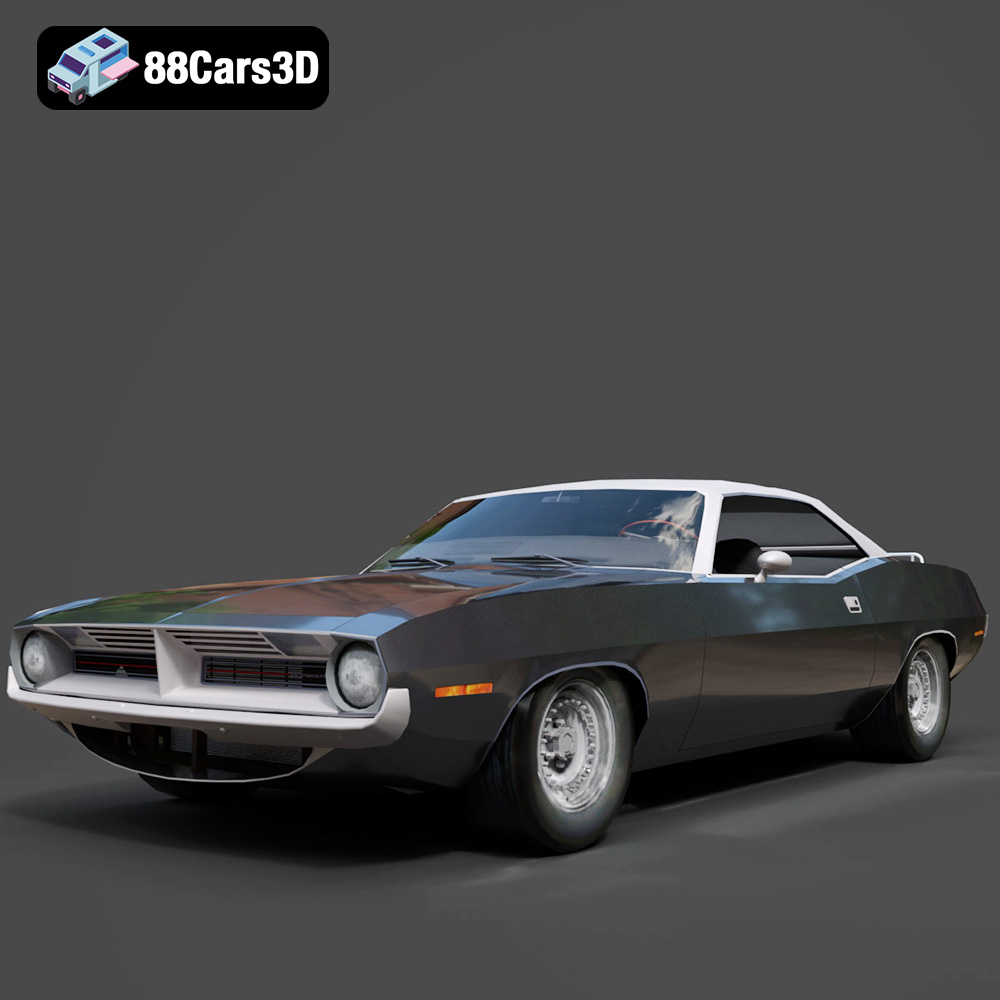
Plymouth Cuda Cabrio 1970 3D Model
Texture: Yes
Material: Yes
Download the Plymouth Cuda Cabrio 1970 3D Model featuring clean geometry, realistic detailing, and a fully modeled interior. Includes .blend, .fbx, .obj, .glb, .stl, .ply, .unreal, and .max formats for rendering, simulation, and game development.
Price: $4.99
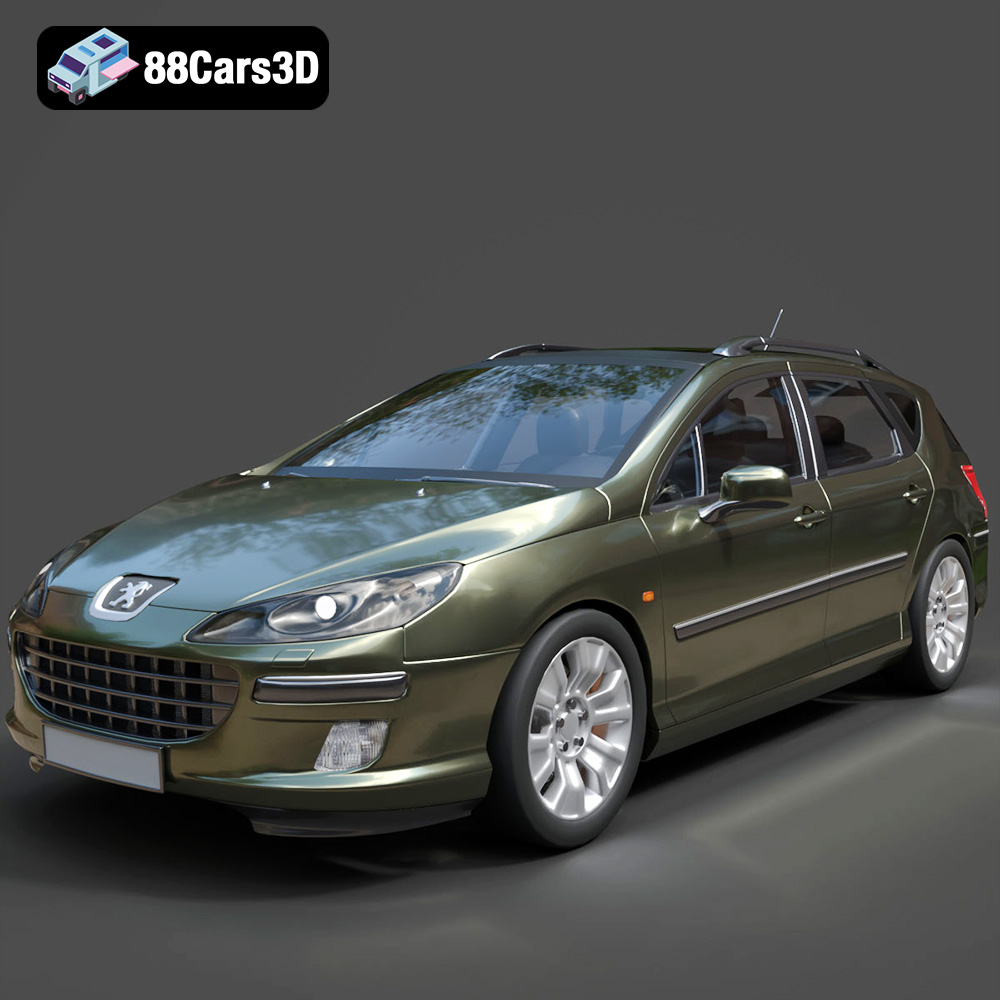
Peugeot 407 SW 3D Model
Texture: Yes
Material: Yes
Download the Peugeot 407 SW 3D Model featuring clean geometry, realistic detailing, and a fully modeled interior. Includes .blend, .fbx, .obj, .glb, .stl, .ply, .unreal, and .max formats for rendering, simulation, and game development.
Price: $4.99